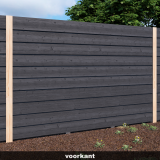
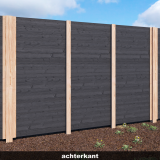
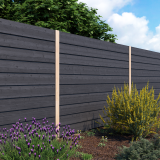
In the 2021 gardening season, Outdoor Life Products introduced its unique mix-and-match concept: build your own fence with a personal touch! Every fence in this range consists of standard components. Within these components, you can mix and match colours and wood types. In this blog by Product Manager Suzie, you can read about all the components we offer, what to look out for during installation, and a few examples of the possibilities.
With the mix & match concept, we have something for everyone; you can combine different colours to design a fence entirely to your own taste. What’s more, the concept is easy to install. The mix & match concept consists of various types of planks available in different colours and materials. For example, you can choose from log cabin profile, rhombus profile and (Swedish) clapboard in Douglas fir, pine and spray-painted black. The log cabin profile and the rhombus profile are slid between slotted posts. The (Swedish) clapboard is installed using a guide board. Below, we share tips and tricks for each type of plank so you can get started straight away.
You can build a mix-and-match fence using the log cabin profile by choosing from:
- A pine or black-painted slotted post.
- Log cabin profile planks in a colour and wood type of your choice. Tip! You can mix and match pine and black-sprayed planks for a playful effect.
- A cover profile plank in a colour of your choice, which sits on top of the fence.
Je bouwt een mix & match-schutting met rhombusprofiel door te kiezen uit:
- Een grenen of zwart gespoten sleufpaal.
- Rhombusprofiel planken in een kleur en houtsoort naar keuze.
- Tip! Het is aan te raden de lip aan de bovenzijde van het rhombus profiel in de lengte af te zagen.
Shelves
To determine the number of shelves required for the desired height, use the effective width of the shelf. You can find this on the product page for each shelf. For example, the effective width of item 1040912 is 12.9 cm.
Slotted posts
When installing slotted posts, ensure you start and finish with an end post; in the middle, you can use a centre slotted post. To create a corner in the fence, place two end posts against each other. In this case, ensure that the slot on both posts is in line with the fence. Treat the part of the post that goes into the ground with rubber sealant up to 5 cm above ground level.
Weather effects on the wood
Wood is a natural product that shrinks and expands due to weather conditions. In summer, the wood shrinks, causing the fence as a whole to settle slightly. From autumn onwards, the planks ‘grow’ due to expansion (moisture). For safety’s sake, allow for a difference in the total effective height of the posts with a 3% difference in effective width between summer and winter. With this in mind, we recommend the following when using slotted posts:
1. When installing the fence, it is important that the bottom board is secured/screwed (fixed) 1 to 2 cm above the ground.
2. The remaining boards do not need to be fixed or screwed in place. This allows the wood to expand in winter.
3. The top board must certainly not be fixed in place either.
4. In summer, to prevent gaps, tap the boards lightly at the top once.
You can build a mix-and-match fence using (Swedish-style) tongue-and-groove boards by choosing from:
- A standard garden post.
- (Swedish-style) tongue-and-groove boards in a colour and wood type of your choice.
- Garden beam in a material of your choice for support.
Assembly
Screw a structural batten to the inside of the garden posts, along the entire length above ground. The (Swedish) tongue-and-groove planks are screwed onto this, using two screws per fixing point. Screw the (Swedish) tongue-and-groove planks to the structural battens on the posts, working from the bottom up. Position the bottom board just above the ground; due to indirect ground contact, the first board will sit lower. To determine the correct number of cladding boards for the desired height of the fence, you can calculate using the effective width of the boards. This can be found on the product page for the relevant board. Place a support batten at the rear of the boards every 80 cm. If desired, the rear can also be clad with (Swedish) tongue-and-groove boards, so that the neighbours have the same attractive appearance.
Date: 8 April 2021
Author: Suzie Buter – Product Manager
As a product manager, Suzie is responsible for managing the garden timber and garden shed range. Suzie: “I deal with data management, marketing communications and content relating to our products. I also focus on product development and keep up with the latest market trends. My work is very varied; every working day is different. This keeps me on my toes and ensures there’s plenty of variety. Developing distinctive products that consumers can easily assemble themselves is what I love doing most.”